
You’ve started adding plyometrics exercises into your training – great move. But the big question is: where to from here? Too much, too soon, and you’re on the sidelines with sore knees or Achilles pain. Too little progression, and you miss out on the strength, speed, and efficiency benefits plyos can offer.
This guide gives runners a clear, evidence-based roadmap on how to progress plyometric exercises to keep improving safely.
What the Research Says – Plyometrics for Performance
- A study in the Journal of Strength and Conditioning Research found that 6 weeks of plyometric training significantly improved running economy and 5K race times in trained distance runners. (Turner et al., 2003)
- A study in the European Journal of Applied Physiology found that increased Achilles tendon stiffness after plyometric training led to improved running efficiency in middle-distance runners. (Spurss et al., 2003)
- The available meta-analyses suggest that plyometric training induces trivial-to-large effects on physical performance for healthy people, and enhanced performance for athletes from different sports (e.g., vertical jump height, sprint time and muscle strength). (Kons et al., 2023)
1. Master the Basics First
Before you chase height, speed, or single-leg drills, you need to earn the right to progress.
🔑 Focus on:
- Appropriate landings: ensure you know what you’re trying to achieve. Stiff joints and fast contact or soft landings with greater time on the ground
- Alignment: knees track over toes, no wobbling in or out.
- Posture: upright torso, braced core and no collapsing of the trunk
- Consistency: can you repeat the movement with the same quality, even when you’re tired?
👉 Sound plays a big role in identifying a good rep. Listen out for how your foot is contacting the ground
Starter exercises:
- Squat jumps and split squat jumps
- Assisted pogos both double and single leg (small, springy ankle hops)
- Skipping variations
- Multi-directional pogos
👉 Stay here until you can complete 2–3 sets of 15–20 reps cleanly and pain-free 2-3x per week.
To read more about beginner plyometrics check out the blog below:
2. Build Your “Plyometric Mileage”
Think of plyometric training like running: you wouldn’t start with a marathon, so don’t start with 200 contacts (landings) in one session. It is also important to differentiate between high intensity and low intensity plyometrics as total reps will change!
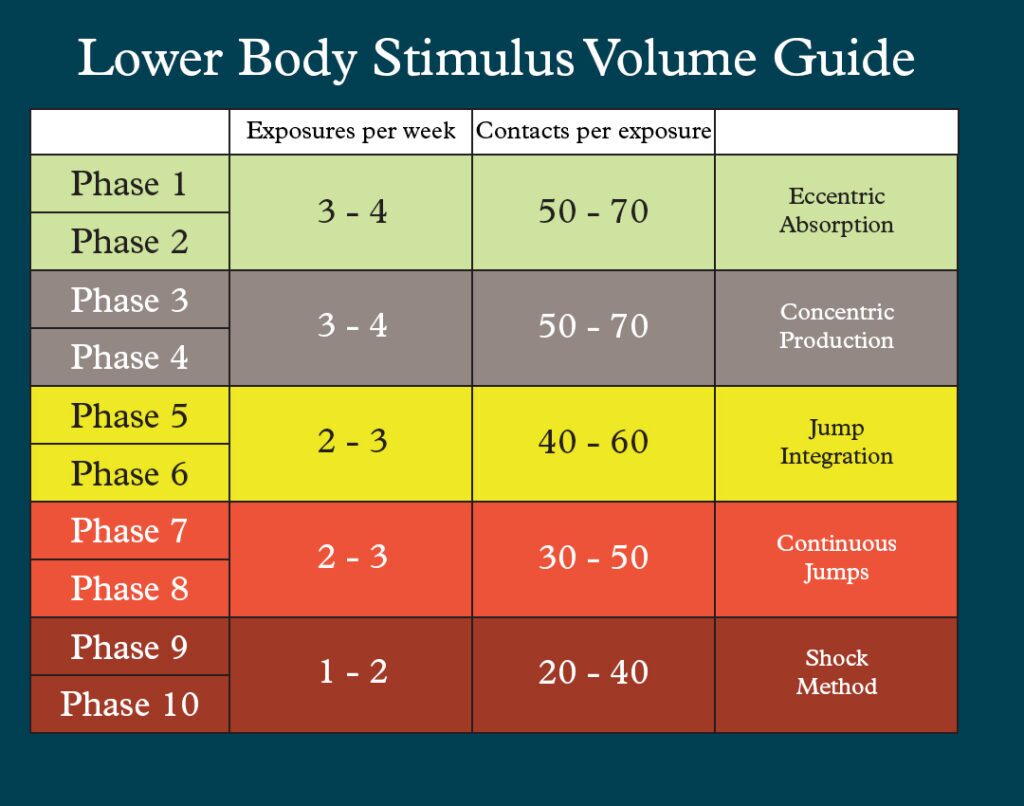
Above is a handy guide from SportsSmith ( https://www.sportsmith.co/articles/implementing-the-plyometric-continuum-to-individualise-jump-and-land-training/) outlining some guidelines for plyometric prescription
Example progression:
- Week 1: 3 × 10 Single leg hops + 3 × 10 bounds (≈ 60 contacts)
- Week 2: Add a set (≈ 80–90 contacts)
- Week 3: Add an extra drill like split squat jumps (≈ 100–120 contacts)
Aim for increases of no more than 10–20% per week.
3. Turn Up the Intensity on Your Plyometrics
Once you’ve got the volume, it’s time to increase the demand of each rep. Intensity is where plyos become truly powerful.
Ways to ramp it up:
- Jump higher: squat jumps → tuck jumps → between box jumps
- Jump further: short bounds → long continuous bounds.
- Move faster: reduce ground contact time with quick hops or hurdle jumps
- Add load: light weight vest, med ball throws with a jump, weighted tall to short
For runners, short ground contact is gold. Research has shown fast, elastic drills like pogo hops and hurdle hops carry directly into better running economy. Ankle dominant drills are likely the biggest bang for your buck.
4. Add Complexity to your plyometrics
Now that you can handle intensity, introduce variety and coordination challenges. This is where the fun begins.
- Single-leg drills: hops, alternating bounds, single-leg skipping.
- Multi-directional: lateral jumps, diagonal bounds, rotational hops.
- Combinations: hop into a forward bound, jump then cut sideways, bound then stick the landing.
- Reactive drills: respond to cues (partner calls “left, right, forward!”).
👉 For runners: progress from double-leg jumps → single-leg hops in place → continuous single-leg hops → single-leg hops → triple hops is an example progression to closer simulate the demands of high speed running
5. Example Plyometrics session for a running athlete
Warm up involving penguin walks, medicine ball slams and any other specific work needed.
Building ankle stiffness focused session
Double leg pogo 3×12 repetitions (36 contacts)
Single leg drop jump 3×3 repetitions each side off small box (18 contacts)
Triple hop 3×3 each side (18 contacts)
This session contains 72 contacts in total with large high intensity exposure
Begin your key lifts once plyometrics are complete!
Double-Leg Pogo Hops
- Focus: Ankle spring, straight knees, toes up between contacts
- Dosage: 3 sets of 12 reps
Single Leg Drop Jump
- Focus: Floor is lava, off the ground quick and high
- Dosage: 3×3 rounds (18 contacts)
Triple Hop
- Focus: Go for distance, short ground contact time
- Dosage: 3×3 each leg (18 contacts)
6. Slot Plyometrics Into Your Week Wisely
Plyometrics work best when you’re fresh. Do them early in your session after a warm-up, or on non-fatigued days. This ensures quality of repetitions to get the most of out of your plyometrics. This part must be highly individualised
For runners:
- Frequency: 2-4 exposures per week.
- Pairing: Combine prior to speed/interval days or before a heavy lift (both high-intensity).
- Avoid: Putting plyometrics after long runs or a heavy weights session – fatigue cancels out quality.
Sessions don’t need to be long. 10-15 minutes of focused work is plenty. Think quality over quantity
Plyometrics for Runners – The Bottom Line
Plyometrics are like rocket fuel for runners and athletes – but only if you progress them smartly.
Here’s your order of operations:
- Nail the basics.
- Build volume gradually.
- Increase intensity.
- Layer in complexity.
- Place them wisely in your training week.
- Pull back when your body needs it.
Do this, and you’ll see the difference: faster stride turnover, improved running economy, and stronger, more resilient legs.
6. Know When to Dial Back your Plyometrics
Progression isn’t always linear. Sometimes the smartest move is to pull back.
Watch out for:
- Persistent knee or Achilles soreness. Plyometrics shouldn’t hurt!
- Heavy legs that don’t bounce back leading to long times spent on the ground. Quantity over quality is the game
- Sloppy, noisy landings – listen to your reps, you should only hear one sound when you hit the ground. Two may indicate that you are letting your heel sink and not using your Achilles well
- For runners especially – any bone pain or increased focal awareness with jumping is a major red flag
If that happens:
- Reduced volume / intensity
- If symptoms persist see a Physiotherapist or EP to ensure no further aggravation of the injury
- Prioritise recovery – sleep, nutrition, mobility.
Plyometrics For Runners – Frequently Asked Questions:
1. Do I need to be strong before starting plyometric training?
A base level of lower-body strength helps you tolerate the impact of plyometric training. You don’t need to squat double your bodyweight, but being comfortable with bodyweight squats, lunges, and calf raises is a good foundation before adding jumping drills.
2. What equipment do I need for plyometric exercises?
Most plyometrics require little or no equipment. A flat surface and some space are enough to start. For variety, boxes, hurdles, cones, or resistance bands can be added later. A physiotherapist or exercise physiologist can advise on which tools are safe and useful for your level.
3. Can older adults do plyometric training?
Yes, with modifications. Research shows that low-level plyometrics (like skipping or small hops) can help improve bone density, balance, and tendon health in older adults. Intensity and volume should be scaled carefully, ideally under professional supervision.
4. How long does it take to see results from plyometric training?
Many athletes notice improvements in jump height, speed, or running efficiency within 6–8 weeks. The timeline depends on your training consistency, recovery, and injury history.
5. Are plyometrics only for athletes?
No. Plyometric exercises benefit anyone who wants stronger legs, better coordination, or improved agility. They are used in rehab, general fitness, and even fall-prevention programs — not just high-performance sport.
6. What’s the difference between plyometrics and regular strength training?
Strength training builds force with controlled movements, while plyometrics train your body to apply force quickly through fast stretch–shortening actions. Combining both gives the best performance and injury-prevention outcomes.
7. How do I recover from plyometric sessions?
Recovery includes hydration, sleep, mobility work, and spacing out high-intensity sessions by at least 48 hours. Ice or compression may help if you feel joint irritation, but consistent soreness suggests your volume is too high.
8. Can plyometric training help me return from injury?
Yes — if programmed carefully. Plyometrics are often introduced late in rehab to restore tendon elasticity, joint stability, and sport-specific power. Your physiotherapist will adjust exercises to your stage of recovery.
9. Are plyometrics safe for children and teenagers?
Yes, when scaled to their size and ability. Bodyweight jumps, skipping, and bounding are natural movements for kids.
10. How can I tell if I’m ready to progress my plyometric training?
You’re ready to progress if you can land softly and consistently, recover without pain or swelling, and perform multiple reps without breaking form. Forceplate testing can be used to monitor improvement and ensure the correct progressions.
Need Help With A Beginners Plyometric Program For Running?
If you’d like some help getting started with plyometric exercises, including how to integrate them into your running training and gym programs, then our team are here to help. One of our physio or exercise physiology team can talk through your goals, assess your current plyo ability, and provide you with a personalised program to get you maximum results while staying safe and avoiding injury.
Click below to ask a question or to book your initial session online, or give us a call on 9280 2322.
